Share |
Showing posts with label tutorial. Show all posts
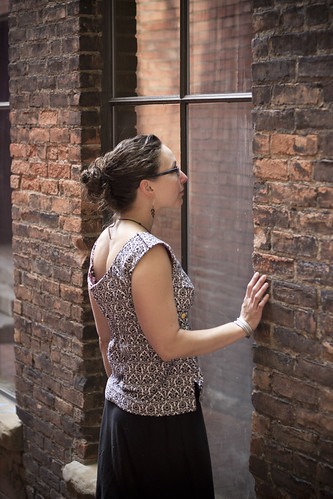
I dressed like a hippie a good portion of high school and college. My poor mother. At least I never tried to sport dreadlocks. Now-a-days I've dressed up my hippie nature a bit and added in all sorts of other styles to mix things up...but parts of me still find my way back to my old ways. Take this bracelet for example.  


LOVE IT. And it's the perfect craft to bring along to make while camping with your best friend! All you need is a ball of hemp or other type of cord, some scissors, and you're ready to go! The book says you need 2- 200inch long lengths of hemp folded in half (then tie a knot at the top to form a loop- this leaves you with 4 strands but you use two together as one thick strand, see image below). In the end we probably only needed about 2 full arm lengths worth (about 130"). Another option... use 3 strands for an even larger thicker bracelet!

It's super complicated looking, but it's super simple once you get the hang of it. The hardest part is tightening it down so the tension is correct. Don't worry, you'll get the hang of it swift enough.

Image taken from Friendship Bracelets: All Grown Up: Hemp, Floss, and Other Boho Chic Designs to Make  For full instructions on how to make this check out the book!


Actually the hardest part was the book not saying you have to do the reverse of the diagrams for every other knot. Otherwise it wont lay flat... So do the above, and then for the next knot... do this:

It's just each step flipped horizontally. Sorry, a little confusing, but once you get the hang of it, so cool!


Your email will never be displayed publicly, so don't be scared to comment! :) Oh and make sure you type in your blog link so I can click over to you! There is a spot you can type it in.

I'm on a little girl's dress making spree. They are just so fun to make, and since they are small, they go together super fast! What's not to love?
You know what makes something go even faster? Bias tape. How haven't I used this stuff before?? I bought some to edge my burlap bag pattern, and I used the rest of it up on this dress. And I may have already gone out and bought a whole bunch more in different widths and colors... because I want to make more things!!!

I started off with this dress pattern, and I had all plans on following the whole thing, but then I decided to finish the armholes with bias tape... and figured... why stop there!? Lets do the neck with bias tape too!!

Adorable! As you can see Hobbes wanted to get in on the photo action. Even though she had a whole yard to run around... she wouldn't budge from under where I hung the dress.


Your email will never be displayed publicly, so don't be scared to comment! :) Oh and make sure you type in your blog link so I can click over to you! There is a spot you can type it in.


If you've been around the blog awhile, you might have seen my post last year about my strapless burlap dress creation for the Joe Bean eco challenge. I didn't win last year but knew I wanted to try again this year! Instead of a rather uncomfortable to wear dress I decided to go with something that was actually usable.

I am SO excited for this purse. I will totally be rocking it after the competition is over. If you want to see it in person along with the other 40 artist's creations, head to Joe Bean Coffee Roasters on Sept 6th to see them all!! I'll be there to sign autographs... since I'm famous *coughcough*

Fingers crossed... although I'm sure there will be some stiff competition.

Want to make your own? Here's how. (totally realize I should have taken pictures... but really it's easy!)


  1. Cut a rectangular piece of burlap and a rectangle of an old t-shirt (for the lining) to the same size. 
  2. Fold materials in half to form a square (nice sides facing in).  Cut a nice curve into the top of both (this is where your handle goes). Sew up along both sides.
  3. Flip bag corners out and sew a line  through each corner to create a box bottom (video tutorial here, you don't need the tool they are selling, just use a ruler. It sounds more confusing than it really is)
  4. Flip burlap right side out and place lining inside. Use double fold bias tape to hold lining and burlap together and sew along curve.
  5. Do the same around the entire top opening of the bag. I added a piece of burlap bag edging into the center of the bias tape to give the top extra strength for when you hold the bag.

click to enlarge


Your email will never be displayed publicly, so don't be scared to comment! :) Oh and make sure you type in your blog link so I can click over to you! There is a spot you can type it in.

Cancer Sucks. Chemo caps don't have to. Searching around for a cute chemo cap doesn't bring up too many results for crochet versions. I half wonder if people don't want to tout their creations as being chemo caps. It's such a negative word, chemo. But when a family member was diagnosed with lymphoma and told she would indeed be loosing her hair, the first thing I asked her was what color hat she wanted me to make her.


"How about white... and maybe a navy one too if you could?"
Happily can do.


I stumbled upon a new stitch recently in this book: 101 Crochet Stitch Patterns & Edgings. It's rather simple. 1 SC and then 3 DC all into the same spot, skip 3 stitches and do it again. The book worked the stitch back and forth, but I decided to try crocheting in the round and the wonderful twirling texture you can see above was the gorgeous result.


Sure you can make one of these for winter, but I think they work as a chemo cap too, made with lots of love and thoughts going into every stitch.

Crochet Chemo Cap
I used Red Heart Soft Yarn, worsted weight (4) and an H hook. This is worked in a round, no turning.

R1: Start by making a magic circle loop, make 6 SC into the loop, and then pull closed  – 6 sc.
R2: 2 SC into each SC around – 12 sc.
R3: [2 sc in next sc, sc in next sc] 6 times – 18 sc.
R4: [2 sc in next sc, sc in next 2 sc] 6 times – 24 sc.
R5: [2 sc in next sc, sc in next 3 sc] 6 times – 30 sc.
R6: [2 sc in next sc, sc in next 4 sc] 6 times – 36 sc.
R7: [2 sc in next sc, sc in next 5 sc] 6 times – 42 sc.
R8: [2 sc in next sc, sc in next 6 sc] 6 times – 48 sc.
R9: [2 sc in next sc, sc in next 7 sc] 6 times – 54 sc.
R10: [2 sc in next sc, sc in next 8 sc] 6 times – 60 sc.
R11: [2 sc in next sc, sc in next 9 sc] 6 times – 66 sc.
R12: [2 sc in next sc, sc in next 10 sc] 6 times – 72 sc.

For the remained of the hat [SC plus 3DC into next SC, sk 3] repeat until hat is desired length and end with a slip stitch. (Each shell is going into the first SC of the previous row shell.) I did 12 rounds of this shell pattern for a total of 24 rounds from start to finish.


Your email will never be displayed publicly, so don't be scared to comment! :) Oh and make sure you type in your blog link so I can click over to you! There is a spot you can type it in.

shirtside
Modeled after a Jane Austin heroine, I quickly fell in love with this shirt pattern over at Meanie Greene (click to get the pattern). Whimsical, polished, super comfy, what's not to love? I do admit I didn't totally follow the patter, yes I know you aren't surprise. You see it called for a side zipper.. and me and zippers, well we get along fine... except when the sewing machine gets involved, then we're enemies. So I decided to forgo the zipper + belt and used elastic instead (cop-out).
shirtsitting

I was going to try and explain what I did to end up with this shirt... but the more I wrote, the more confusing it got... so I think it's better if I just keep my mouth shut.
shirtback

Basically I used her pattern up to step 6. Then I got creative with elastic and creating a side wrap with button closure. (see the cute yellow button on my side) The end. :)


Your email will never be displayed publicly, so don't be scared to comment! :) Oh and make sure you type in your blog link so I can click over to you! There is a spot you can type it in.
**GIVEAWAY NOW CLOSED**

Happy Monday everyone! With the holidays over and everyone settling back into their routines I thought it would be fun to do a little more gift giving. This time of year is perfect for staying in, cozying up with a fire, a good movie, and a fun crochet project. Last week I saw this pattern over at The Wrong Century, and immediately started it that night. A few TV shows and a movie later and I was done! I ended up changing the pattern somewhat from the one Jeanne found, but I'm really happy with the results.
cowl
Now the fun part, a giveaway!! You pick the color and I'll make it up especially for you! (choices are off white, cream & dark brown) I just want to thank you all for coming back to listen to me ramble on, and commenting, which always makes my day (well except for those few mean comments... seriously do people have nothing better to do with their time??) And for those who don't win... the pattern! So you can make one yourself!

How to enter: (I'm willing to ship to US and Canada, sorry everyone else, it's just too darn $$!) You can enter any or all of the following ways. (leave a separate comment for each entry if you are doing multiple entries) You have until Sunday the 15th by noon EST to enter

1) Leave a comment telling me what you like about my blog and/or what you'd like to see more of.
2) Follow my RSS feed. (you can use the subscribe button in the left column). Then leave me a comment telling me you did, or telling me you already do.
3) Like ::steph chows:: on Facebook. Leave a separate comment saying you did, or already do follow.
4) Follow @steph_chows on Twitter. Leave a separate comment saying you did, or already do follow.
5) FB or tweet about the giveaway, make sure to link back to this post. Leave a separate comment saying you did.

Now the pattern. I used a worsted weight yarn and a size K hook. It looks more complicated than it really is! You can print a PDF of it here.

Ch 150 and join in the first ch with a sl st.
Row 1: ch3 (counts as a first dc), place marker if you wish, *(skip 1 ch stitch, dc in next ch, ch1)* repeat from *, join with a sl st in the top of ch3
Row 2 : ch2 (counts as a first sc), *(sc in the space between two dc in previous row, ch1)* repeat from *, join with a sl st in the top of ch2
Row 3: ch2 (counts as a first sc), *(sc in the space between two sc in previous row, ch1)* repeat from *, join with a sl st in the top of ch2
Row 4: repeat row 3
Row 5: ch3 (counts as a first hdc), *(skip 1 ch stitch, hdc in next ch, ch1)* repeat from *, join with a sl st in the top of ch3
Row 6 : ch2 (counts as a first sc), *(sc in the space between two hdc in previous row, ch1)* repeat from *, join with a sl st in the top of ch2
Row 7: ch2 (counts as a first sc), *(sc in the space between two sc in previous row, ch1)* repeat from *, join with a sl st in the top of ch2
Row 8-9: ch2 (counts as a first sc), *(sc in the space between two sc in previous row, ch1)* repeat from *, join with a sl st in the top of ch2
Row 10: ch3 (counts as a first dc), *(dc in the space between two sc in previous row, ch1)* repeat from *, join with a sl st in the top of ch3
Row 11-14: repeat rows 6-9
Row 15: ch3 (counts as a first hdc), *(skip 1 ch stitch, hdc in next ch, ch1)* repeat from *, join with a sl st in the top of ch3
Row 16 : ch2 (counts as a first sc), *(sc in the space between two hdc in previous row, ch1)* repeat from *, join with a sl st in the top of ch2
Row 17-18: ch2 (counts as a first sc), *(sc in the space between two sc in previous row, ch1)* repeat from *, join with a sl st in the top of ch2
Row 19: ch3 (counts as a first dc), *(dc in the space between two sc in previous row, ch1)* repeat from *, join with a sl st in the top of ch3
Row 20: repeat row 2
Fasten off and weave in ends.

Now one more step, In order for both sides of the circle to look finished I did one row of (sc, ch, sc) around the starting edge (where you started with ch 150). You don't have to, but it looks a touch more finished. Attach your yarn and ch2 (counts as a first sc), *(sc in the space between two dc in previous row, ch1)* repeat from *, join with a sl st in the top of ch2
Fasten off and weave in ends.

This pattern is for personal use only and may not be reproduced for commercial purposes.

Your email will never be displayed publicly, so don't be scared to comment! :) Oh and make sure you type in your blog link so I can click over to you! There is a spot you can type it in.

Want more chow like what you just read? You can click to subscribe to the feed, follow me on twitter, or become a fan on facebook! Can't wait to see you there!
Copyright © 2012 :: steph chows ::.