Share |
Showing posts with label sewing. Show all posts
I'm on a little girl's dress making spree. They are just so fun to make, and since they are small, they go together super fast! What's not to love?
You know what makes something go even faster? Bias tape. How haven't I used this stuff before?? I bought some to edge my burlap bag pattern, and I used the rest of it up on this dress. And I may have already gone out and bought a whole bunch more in different widths and colors... because I want to make more things!!!

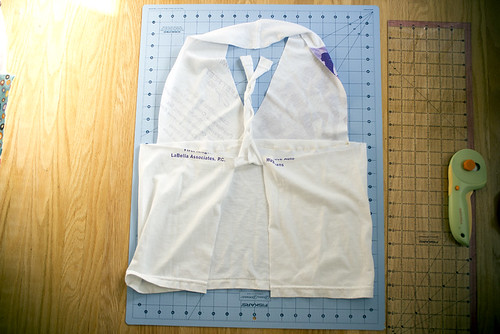
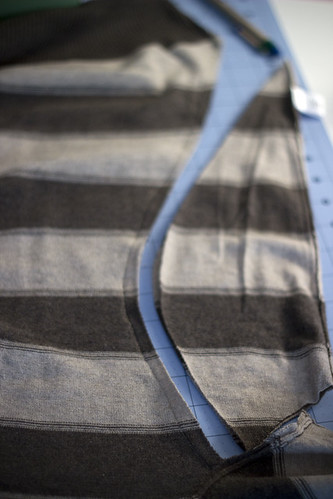
I started off with this dress pattern, and I had all plans on following the whole thing, but then I decided to finish the armholes with bias tape... and figured... why stop there!? Lets do the neck with bias tape too!!

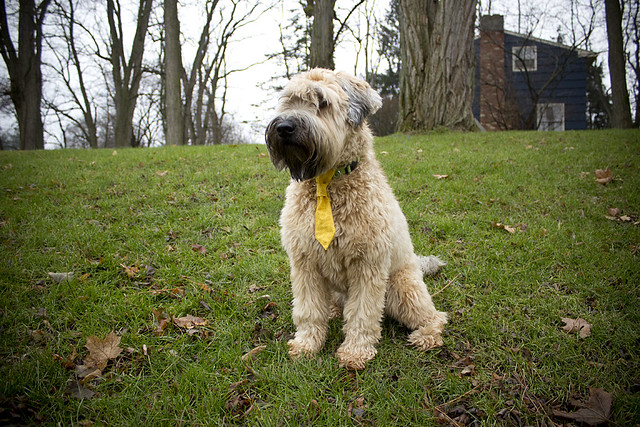
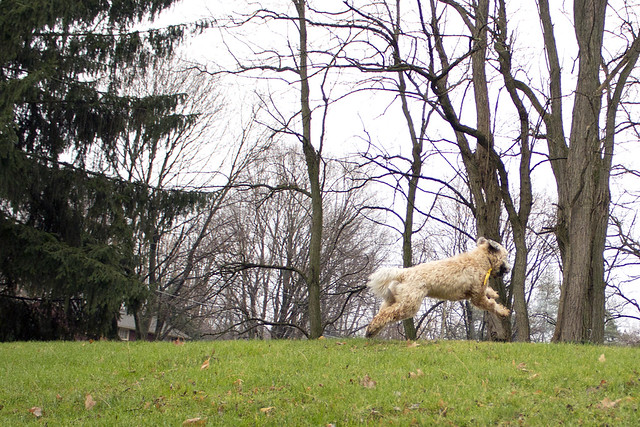
Adorable! As you can see Hobbes wanted to get in on the photo action. Even though she had a whole yard to run around... she wouldn't budge from under where I hung the dress.


Your email will never be displayed publicly, so don't be scared to comment! :) Oh and make sure you type in your blog link so I can click over to you! There is a spot you can type it in.


Sometimes patterns are so simple and sew up it's hard to believe I don't get around to doing them quicker. I pinned this one year ago... why oh why did it take me so long to actually SEW this!? Hmm maybe because that post only gave an idea of the pattern, not one you could just print. Don't worry though I made sure to save my pattern to share with you. Which means you can print it out and be done with this cute dress in less than an hour!


Look at that girl! She is cuter than cute! And the dress is reversible! So she asked to wear it two days in a row. You know this aunt right here felt so very special that her little neice loved it so much.

My heart melts looking at how cute she is. Here's the pattern I drew out and used. It JUST fit her though (18months), the neck could have been a bit larger so if I were you I'd extend the straps by an inch (added into pattern PDF).

Download the pattern for free here.

Cut out two complimentary fabrics on the fold. Add a quick pocket if you like. Then place right sides facing together and sew along each armpit and then around the entire outer edge. Leave the top of a 4 straps open. Use one of these openings to pull entire dress through so it will be right side out. Iron flat and top stitch around all edges (just don't close off the strap openings yet). Final step, cross the straps in the back and fold over one edge so the front strap fits into the back strap piece, sew one line across each and you're done!

The back is open so make sure she's got a cute diaper cover on, her bum is suppose to stick out a bit. Another plus, this dress makes for super easy access when potty training, making this dress cute AND functional. Double bonus!

Make sure you save this post for later and Pin It so it doesn't get lost!


Your email will never be displayed publicly, so don't be scared to comment! :) Oh and make sure you type in your blog link so I can click over to you! There is a spot you can type it in.


If you've been around the blog awhile, you might have seen my post last year about my strapless burlap dress creation for the Joe Bean eco challenge. I didn't win last year but knew I wanted to try again this year! Instead of a rather uncomfortable to wear dress I decided to go with something that was actually usable.

I am SO excited for this purse. I will totally be rocking it after the competition is over. If you want to see it in person along with the other 40 artist's creations, head to Joe Bean Coffee Roasters on Sept 6th to see them all!! I'll be there to sign autographs... since I'm famous *coughcough*

Fingers crossed... although I'm sure there will be some stiff competition.

Want to make your own? Here's how. (totally realize I should have taken pictures... but really it's easy!)


  1. Cut a rectangular piece of burlap and a rectangle of an old t-shirt (for the lining) to the same size. 
  2. Fold materials in half to form a square (nice sides facing in).  Cut a nice curve into the top of both (this is where your handle goes). Sew up along both sides.
  3. Flip bag corners out and sew a line  through each corner to create a box bottom (video tutorial here, you don't need the tool they are selling, just use a ruler. It sounds more confusing than it really is)
  4. Flip burlap right side out and place lining inside. Use double fold bias tape to hold lining and burlap together and sew along curve.
  5. Do the same around the entire top opening of the bag. I added a piece of burlap bag edging into the center of the bias tape to give the top extra strength for when you hold the bag.

click to enlarge


Your email will never be displayed publicly, so don't be scared to comment! :) Oh and make sure you type in your blog link so I can click over to you! There is a spot you can type it in.

I just finished writing up this post... I was putting the finishing touches on it. I typed something I did like so I hit Control Z (edit undo) and for some reason it undid the whole post... as I was staring at the blank screen totally dumbfounded, it auto saved, talk about adding insult to injury. There was no undoing, nothing to bring back that long detailed post. I may have started cursing my head off...maybe...

*sigh* I do still love this shirt, even if I have to rewrite this whole darn thing. You see, it's a halter top, but with a wicked fun drapped low cut back. A single braided band attaches at the base of the old armpits holding everything together (and making it so you don't have an accidental side boob slip). It's my new go to workout shirt! Well minus the sports bra for the photoshoot. It's harder to see how the back attaches when you have a sportsbra in the way.


So yeah, this + a sport bra = my new go to workout top for hot spring/summer days! It's rather easy to make and comes together with only a few stitches in a couple spots. If you make your own and blog about it please leave me a link in the comments! I'd love to see, and if you could link back here to the instructions I'll love you forever :)

Now onto the steps... just follow along with the photos and you'll be sporting this sassy shirt in no time.

First start by folding your shirt in half down the middle.

Once the sleeves and neck are gone open and fold so that the armpit holes line up and the shirt is on its side (2nd image down). Then with a gentle down slope, cut off the back from bottom of armpit down. (3rd image down)

Open up the now freed back and cut away excess as shown in 2nd image down, then cut each of the straps into 3 pieces.

Braid each strap and knot the ends. Cut one strap off at shoulder and reserve the braid (we will attach it to the back in a moment). Create the halter top by sewing or tying the remaining attached braid to the other shoulder (2nd image down).

Finally take your reserved braid and attach each side at the bottom of the old armpits (if your shirt has side seams this is a great indication of where you should be attaching things. Try on and walk around town like a badass. I mean you might as well show off the muscles you've been working hard on right?


I must admit, I never thought I'd be one of those people who dressed their animal up. I always thought they looked so sad and ridiculous... and then I had Hobbes (yes I birthed her, she is my baby), and now I want to dress her up all in all types of ridiculousness. John however has other plans, the plans that involve no dog clothing at all. Guess who won?
distinguished
I mean I made it myself, so he can't argue I'm wasting money on silly things, and look how distinguished she looks! She's ready for an interview! If the job calls for running around the yard like a mad woman she would get it in a second.
deer
Hobbes said, "I am so done with this photoshoot SEEYA!"
Gotta love the tie flapping in the breeze as she runs. :)

You know you want to make your own dog tie right? It's insanity easy and you can get the free pattern over at dog under my desk. Totally cute site, go check it out, and make this tie in every color of the rainbow. :)


Your email will never be displayed publicly, so don't be scared to comment! :) Oh and make sure you type in your blog link so I can click over to you! There is a spot you can type it in.

That girl would look good in anything, even a burlap sack... ok that may not be the case for me, but it was still fun participating in an upcycling event hosted by Joe Bean Coffee Roasters, Thread, and Greentopia!
burlapbag
The rules were simple, pick up a burlap coffee sack from Joe Bean and make it into something fabulous. I chose a strapless dress, because I'm oh so classy. My favorite part is the herringbone exposed zipper in the back, too cute right?
burlapdressback
Note to self: when sewing burlap remember to add ample seam allowance, it will unravel and burlap does NOT stretch... (not pictured, me from behind with the zipper not being able to zip the last 3 inches up... awesome)
burlapdress
Want to see my creation along with others on display?? Come to Joe Bean tomorrow for First Fridays and vote for me to win!! Ok you don't have to vote for me, but come on down and see all the awesome creations and drink some of the most delicious coffee around!

See you there??

Your email will never be displayed publicly, so don't be scared to comment! :) Oh and make sure you type in your blog link so I can click over to you! There is a spot you can type it in.

It was my birthday a few weeks ago and as you know I went camping with my best friend... what I didn't tell you is she made me a freaking amazing skirt for my present!
skirtside
She took a mans button down and transformed it into instant cuteness. Want to make one? Head on over to her blog to find out how!
skirtfront
Do you like refashioning things? I love it!!

Your email will never be displayed publicly, so don't be scared to comment! :) Oh and make sure you type in your blog link so I can click over to you! There is a spot you can type it in.

Print
front
This is my go to workout shirt when it's hot out, great ventilation without just walking around in a sports bra. The best part is you can use up all those old tshirts you have laying around that you don't know what to do with or don't fit you perfectly. Want to make your own? Just follow along!
back

shirt1

Take an old tshirt and lay it on a safe cutting surface. Place your "boob triangle" on the shirt with the top edge lining up with a shoulder seam. (this is where the halter comes from, that seam goes on the back of your neck) Make sure your triangle is large enough to cover one boob... unless you like them hanging out there for everyone to see, hey I'm not judging you... Use a rotary cutter to slice through both layers of the shirt. (my triangle is about 2" wide at the top, and 8.5" at the bottom)
shirt2
Next slice a straight line across the bottom (this will be the bottom of your tee, make it as long or as short as you'd like)
shirt3
Cut a straight line an inch from the side of the shirt cutting through both layers (don't cut all the way to the top, leave an inch of shirt at the top) Next slice that piece in half, again not all the way to the top.
shirt4

Your shirt should now look like this:
shirt5
Now for the actual sewing, place your halter onto the front of your shirt bottom and sew in place, I used a zigzag stitch, but feel free to use a straight line. I'd suggest pinning and trying to on before you sew it in place, make sure all your goods are covered up.
shirt6-
Now we move to the back. Remember those nice 2 strips you cut (feel free to cut 3 and do a braid here). Take them and twist them around each other, ending at the center of your halter top.
shirt7
shirt8
Have them wrap around the halter neck and sew them together.
shirt9

The final step is to attach the bottom edge of your shirt to each other. A few stitches to hold it in place, and you're done!
shirt10

Think you'll give it a go? Let me know how you like it! I love how it can take a boring tee and make it into something fun to wear :)
 

Your email will never be displayed publicly, so don't be scared to comment! :) Oh and make sure you type in your blog link so I can click over to you! There is a spot you can type it in.
shirtside
Modeled after a Jane Austin heroine, I quickly fell in love with this shirt pattern over at Meanie Greene (click to get the pattern). Whimsical, polished, super comfy, what's not to love? I do admit I didn't totally follow the patter, yes I know you aren't surprise. You see it called for a side zipper.. and me and zippers, well we get along fine... except when the sewing machine gets involved, then we're enemies. So I decided to forgo the zipper + belt and used elastic instead (cop-out).
shirtsitting

I was going to try and explain what I did to end up with this shirt... but the more I wrote, the more confusing it got... so I think it's better if I just keep my mouth shut.
shirtback

Basically I used her pattern up to step 6. Then I got creative with elastic and creating a side wrap with button closure. (see the cute yellow button on my side) The end. :)


Your email will never be displayed publicly, so don't be scared to comment! :) Oh and make sure you type in your blog link so I can click over to you! There is a spot you can type it in.
I love the clearance rack at stores. I can't help myself! Take for example this sweater that was 90% off... it was $4. I mean it would be silly not to buy it right? And it looks so flattering on me wouldn't you agree??
before
Ok maybe not, but that doesn't mean I didn't buy it anyway. I wanted it to be my guinea pig in a refashion experiment. I'm always seeing these beautiful refashions on blogs and figured, ok it's time to try one for myself.. so here's what I did. A very basic, nothing fancy refashion.

First I put the sweater on inside out, and pinned my little heart out. No not pinterest, like with real live hurt when you accidentally stab your side kinda pins. Then I tried to take it off and realized I'd pinned not only the sweater together, but also my shirt I was wearing.... starting over, pin without pinning yourself to the sweater.

This is the point where you could spend hours lining all of the lines up front to back so they will meet perfectly at the seam... this is where I said "eh good enough" because I'm the most impatient person in the word. (My mom is probably rolling her eyes because she would have spent 10 hours making sure they lined up perfect)

pins
Next I sewed up the sides using my pins as a guide, then I took a rotary cutter and cut away the excess material. *see picture below* (I left the arms attached at this point since I wasn't sure how long I wanted the sleeves, I just cut along the armpit to detach the side panel I just cut off)
cut
(I totally took the above picture upside down... think of the neck hole being at the bottom of the shot with the arm going off to the right. Ya think my body is shaped a little more curvy then the original sweater.. nah not one bit...)
serger
Final step was to slice off the arms and sew the armpit together. I used a serger to finish the inside seams along with the edges of the sleeves. *see above* (I know most people don't have a serger so if you don't just use a zig-zag stitch so the edges don't unravel all over the place) I was trying to decide if I'd fold up the sleeves and sew a hem to make them looked finished, but decided against it, deconstructed look here I come!
after1
At this point I decided I didn't like the original sweater neckline and wanted to change it up. You'll also notice that Hobbes felt she should be part of the photo shoot.

I freecut the neck opening using my rotary cutter again, to keep things simple I made the same scooped neckline for the front and back so I only had to make one cut through the front and back of the material at the same time. *i'm lazy* To finish it off I used my serger again so the edges wouldn't fray.
after
(Notice the horribly lined up side seams... yes mom you were right, I should have taken my time and lined them up. I rock.)

One bad thing about making the front and back neck hole the same... you don't know which side is the front anymore... I'm actually wearing it backwards in the last shot, look at the before I changed the neckline shot, that side seam lines up WAY better.. at least I got one side lined up nice :) That counts for something doesn't it???

Amazingly easy and only took me about an hour from start to finish. Gotta love projects like that.

Do you refashion? Got any tips of tricks or favorite projects? How the hell do you get side seams to line up??


Your email will never be displayed publicly, so don't be scared to comment! :) Oh and make sure you type in your blog link so I can click over to you! There is a spot you can type it in.
Want more chow like what you just read? You can click to subscribe to the feed, follow me on twitter, or become a fan on facebook! Can't wait to see you there!
Copyright © 2012 :: steph chows ::.