Share |
Showing posts with label vegetables. Show all posts
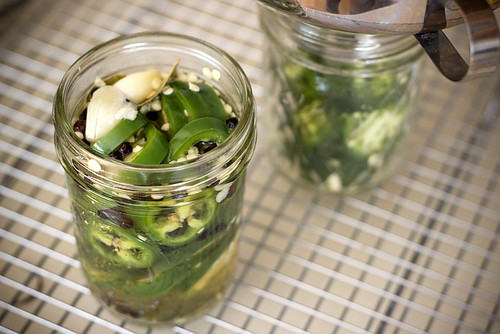
I'm on a spicy kick around here and I like it! Pickled jalapenos can be kinda lame and dead looking in a jar... or you can make them yourself and have crisp delicious perfectly flavored heat! The more time they marinate the softer they will become, so if you like them crisp eat them up faster. I left all the seeds in with these... next time I'll leave some out so I get more flavor with less intensity :) Not that I'm saying I cried or anything...
pickled
This was my first try at pickling, have you pickled things or are you more of a sweet lover?
spicy
Pickled Jalapeños Recipe
recipe by Purple Foodie (check out her blog to learn the perfect pickling ratio)

330g jalapenos, whole or sliced
1 cup apple cider vinegar
1 cup water
1 tbsp peppercorns
2 bay leaves
3 cloves of garlic, lightly pounded
2 tbsp coarse sea salt
1 tbsp sugar

Pack the jalapeños in a glass jar.
In a saucepan, add the rest of the ingredients and simmer for about 5 minutes.
Pour the hot pickling liquid over the jalapeños and let it rest for a few hours. Shake it up a little so that the peppercorns are evenly distributed.
For a crunchy bite, you can start nibbling on them within a few hours. As for softer texture, let this sit for 4-5 days.
Keep refrigerated for upto two months or can it according to jar manufacturer’s instructions.

Your email will never be displayed publicly, so don't be scared to comment! :) Oh and make sure you type in your blog link so I can click over to you! There is a spot you can type it in.

Through the Foodbuzz Tastemaker program I was given the chance to try Green Giant Steamers on the house! Basically it's a bag of frozen veggies in a light herb and olive oil sauce. A quick trip in the microwave and they steam themselves in their own bag, no fuss no mess.
GreenGiant
Now the big question is what to do with these things? Sure you can eat them plain and serve them next to your favorite protein, but I needed to get more creative than just that. Let the brainstorming begin!

  1. Add them to your favorite soup or frozen dinner to give it some more filling bulk. This works great with low sodium canned soups or entrees you make at work. Steam the veggies, microwave the soup/meal, mix, and go!
  2. Super fast asian, steam up and toss with some brown rice (boil in bag kind is ready in 10 minutes), defrost some cooked shrimp, drizzle on your favorite sauce (sweet and sour maybe) and good to go! Just as fast as takeout but WAY healthier.
  3. Steam, then puree with some coconut milk and curry powder + salt pepper in a blender for a super easy fast soup.
How would you use these as a time saver? Or what would you make? Any better ideas then what I came up with?

Have you entered my giveaway? Today's the last day! :)

Your email will never be displayed publicly, so don't be scared to comment! :) Oh and make sure you type in your blog link so I can click over to you! There is a spot you can type it in.

greenmonster2

We're not talking about a green eyed monster here, we're talking about green monster smoothies!! I first heard about them on Oh She Glows and was scared. VERY SCARED.
questionable
I closed my eyes and down it went... I waited for the grassy disgusting taste to hit me in the face... but it never did. Opening one eye at a time I did indeed drink the green monster, but it didn't taste green? It actually just tasted pretty darn good! I've been against trying one of these for what feels like years now but I finally decided to try it for the better of my body. I'll explain more tomorrow, I was sent a book to review and although I went into it 100% skeptical it kinda got me thinking... and changing up a few things... enter in the green monster. Tune in tomorrow(here) to hear more about it :) But for now... go try a green monster, you actually just taste the sweet of banana and milk, nothing green or grassy about it. Believe me, I was TOTALLY skeptical about these, but John and I have been drinking them every day the past few days and loving them. We've tried adding some different berries/ nut butters as mix-ins too. Delicious!

greenmonster

I never would have guessed John would be drinking one of these with me, but I'm glad he is, if I'm going to be staying healthy and living a long time, he sure as hell better be along for the ride with me :)

Have you tried a version of the green monster? Think you will now? If you want to come over I'll make you one to try :)


Green Monster
Recipe via oh she glows
makes enough for 2 people

2 cups baby organic spinach
1 cup milk of choice (we used fat free milk but I want to give it a go with almond milk soon)
1 Tbs ground flax seeds
1 banana
ice

Layer in a blender, spinach, then flax, then banana, then milk. Blend until spinach is totally liquefied. Add ice and blend some more. Drink immediately, if you let it sit it will separate into layers and then it looks weird.

Your email will never be displayed publicly, so don't be scared to comment! :)Oh and make sure you type in your blog link so I can click over to you! There is a spot you can type it in.

Another thing we got copious amounts of in our CSA were this tiny tiny baby eggplants. What does one make with tiny eggplants?eggplant and garlic sauce! I also used a whole head of fresh garlic that also came via the CSA. mmmm garlic!!! I didn't really follow a recipe for this so here's an eyeball overview of what I did.

Probably 12 or so mini eggplants cut into rings or halved and cut into rings
1 onion sliced
1 head of garlic, chopped
1 fresh jalapeno chopped
oyster sauce
soy sauce
tiny bit of corn starch to thicken the sauce
brown rice
hot chili oil

First heat up the chili oil and saute the onion and garlic until nicely browned. Add in the eggplant and jalapeno until soft and cooked through. Add in oyster and soy sauces and toss to coat, if you want a thicker sauce add a little bit of corn starch. Cook brown rice according to directions and serve!


eggplant

What's your go to eggplant recipe? Normally mine is eggplant parm, but these seemed to tiny to bother with the fuss of making it.

Your email will never be displayed publicly, so don't be scared to comment! :)Oh and make sure you type in your blog link so I can click over to you! There is a spot you can type it in.

Yesterday was the longest day of the year (daylight wise that is) which means the days are getting shorter now, noooo!!!! But it also means it's officially summer! To celebrate I wanted to make something super fresh utilizing the copious amount of veggies we got from our CSA this week!


Arugula, turnips, garlic scape (anyone else have to google that? I had no clue what they were), bok choy, leafy greens! The best part is I'm storing all of my veggies in those Clearly Fresh Bags I told you about a few weeks ago! (I'm also going to mention that the sprouts are now officially 4 weeks old... and still aren't floppy or dried up.. insanity. I had some on my lunch salad today. And they were good!).


I decided to whip up a quick arugula pesto. Have you ever made your own pesto?? You really should, it smells so amazingly fresh it's unreal. All it takes is a few minutes in a food processor and you are good to go!


Arugula Almond Pesto (makes about 1 cup of pesto)
adapted by steph chows
In a food processor spin until well chopped
6oz arugula washed and dried (about 1.5 cups packed)
1 scape (or you can use a few cloves of garlic)
3 Tbs slivered almonds
1/4 cup parmigiana cheese
1/4 tsp salt

Then slowly drizzle in
1.5 Tbs olive oil
2 Tbs water

We had this over pasta tonight, it was a bit bitter (just a warning) but delicious! We also grilled up some chicken and adding that into the mix made it a lot less bitter tasting.

Another great way to celebrate summer officially starting is a giveaway!

The wonderful people at Clearly Fresh Bags have offered 20!!! of my readers a package of Clearly Fresh Bags to try out!! Want to know how to enter?

You can enter up to 3 times. Just leave a separate comment for each entry.
Shipping is only to the US at this time (sorry my international peeps).
1. Comment and tell me what would you store in your Clearly Fresh Bags?
2. Tweet /FB / or blog about the giveaway (then come back here and comment to let me know) Example: Check out this awesome giveaway @steph_chows for Clearly Fresh Bags! http://stephchows.blogspot.com
3. Like me on Facebook, then come back here to comment and tell me know you did!

You have until Friday July 1st midnight to enter the contest! Good luck!! But come on, 20 people will win!! That's crazy good odds!

Can't wait that long? Head on over to Clearly Fresh Bags and you can take 15% off your total purchase by using the code stephchow15 while supplies last (so head on over!)


Your email will never be displayed publicly, so don't be scared to comment! :)

Have you ever heard of Clearly Fresh Bags? According to their website and packaging they make your produce last up to 50% longer. For a person like me who buys lots of fruits and veggies with great intentions... but doesn't always get around to eating them in time... this was a great idea!!


OK random question time. How do you like your bananas? Still a little green? Totally yellow? Starting to turn brown? It seems no matter how you like a banana the peek yumminess (yup that's a technical term) lasts about 1-2 days... and then it's all down hill and banana bread time. So that means you either need to hit up the grocery store every other day... or eat some not perfect to your liking bananas. These bags kept the bananas perfect for days!! For this reason alone I am OVERJOYED by these bags!! Look at the picture below.


Those bananas on the right have looked EXACTLY the same for the last 4 days!! The one left outside the bag.. whomp whomp.. sad sad banana, you will be turned into bread.

The bags also work with produce you keep in the fridge. Take my awesome home grown sprouts for example. Both of the piles below have been stored in the fridge for 2 weeks... which would you rather eat?


Clearly Fresh sent me a sample pack of their bags to test out. So the bags were provided to me but the opinions are all my own and totally truthful. You can learn more about their products here.

Your email will never be displayed publicly, so don't be scared to comment! :)

This weekend wasn't very eventful. We worked in the yard (the winter totally killed ours, how about you?) After what felt like 8 hours we gave up on it and called it a day. Other exciting things included painting John's man cave, looking into sofas, and lots of laundry.. we sure do know how to live on the wild side... Please tell me you all did something more exciting??

Anyway, on a totally unrelated note, sometimes side dishes can be so boring and colorless... enter in these crazy easy potatoes! Simply cubed up with some onions, a good helping of rosemary, black pepper, a little sea salt and olive oil. Toss and you are good to go!


Chop up into equal size pieces:

1 large yam
3 medium red skin potatoes
1 medium onion

Drizzle with olive oil

Add rosemary, black pepper, sea salt to taste.

After mixed together dump onto a tin foil lined pan, roast at 350 tossing around every 10 minutes. Roast for a total of 35-45 minutes or until browned.

Your email will never be displayed on this site or stored, it's only there so I can email you back directly if you have questions. Don't worry I wont spam you!!! Unless you want me to send you some of the lunch meat... :D

This cake has a secret... want to know what it is?? and it's not that is was cooked in some new crazy cooking method using dutch ovens.


That's right... beets!! I asked John if he liked beets, he informed me if I made any he wouldn't be eating them... well I'll show him!


Grating up beats allows you to sneak them into all types of innocuous things... like CAKE!


The only issue is when said husband comes downstairs while you are in process of baking and he sees said bowl of grated beets.

"Are those beets... and are you putting them in a CAKE?!?"
"Nah those aren't beets"
"What are they then"
"I aint telling"
"They ARE beets!! You lied to me!!! What now that we're married you lie to me"
"It's for your own good, now go back to your man cave and let me bake"
"Well I aint eating it!"

The cake came out beautiful and I happily dug into it with a scoop of ice cream on the side.
"mmmmmm this is sooo good!! too bad you don't want any since there are beets in it... more for me!"
"Well... maybe I could have a little slice"
"Nope you don't eat beets, sorry."

Needless to say I caved and let him have a slice... and he loved it... stinker :D

I found this while randomly browsing in the library... best way to find new things if you ask me!

Deep Dark Chocolate Cake (my changes in red)
Recipe from Cook Yourself Thin

Serves 10
Calories per serving: 222

For the cake
Cooking spray
1 1/2 cup self-rising flour ( I used 1 cup APF + 1/2 cup whole wheat flour + 1 tsp baking powder)
1/4 cup finely ground almonds
5 tablespoons cocoa powder
1 teaspoon baking soda
1/4 teaspoon salt
4 ounces beets, peeled and finely grated
4 ounces low-fat buttermilk (I used fat free milk plus a squeeze of lemon)
2 tablespoons strong black coffee (I used instant espresso)
3 large eggs
3/4 cup sugar

For the icing
1/2 cup dark chocolate, cut into small pieces
2 tablespoons strong black coffee (I used instant espresso)
2 tablespoons honey

1. Preheat the oven to 350 degrees.

2. Lightly spray an 8-inch springform baking pan with cooking spray.

3. In a small bowl, combine the flour, cocoa powder, ground almonds, salt and baking soda, and set aside.

4. Using a standing or handheld mixer set at medium speed, beat the eggs and sugar for 4 full minutes until pale and fluffy. On low speed, beat in the grated beets, followed by dry ingredients. Add the buttermilk and coffee, and beat until the batter is smooth.

5. Pour into the pan and place in the middle of a hot oven and bake for 30 minutes. (Mine took 40 for some reason) Test with a toothpick inserted for doneness; it should come out clean. Bake for an additional 5 minutes if needed.

6. Cool for 10 minutes or so in the pan and unmold onto cooling rack. Cool on a wire rack until cold. 7. To make the icing, prepare a double boiler.

8. Combine all the ingredients and gently stir until the chocolate is smooth. Stir occasionally until the mixture thickens.

9. With the cake still on the wire rack, pour the icing liberally over the top of the cake and let it drip down the sides. Transfer onto a plate or cake stand for serving.


Chow!!!!

9 am: We reach the market and look around for someone wearing Chef whites. We easily pick out Jeff and are greeted warmly with our mission. Pair up with two other classmates and we have $20 to spend to pick out ingredients for making a 3 course meal. Pantry staples and proteins (shrimp, beef, chicken) are available back at the kitchen. Ready Set GO!!!!


Let me give you some background first. John and I signed up for this class at the New York Wine and Culinary Center. It is offered every Saturday and we are already talking about going back with friends to do it again. Jeff the instructor was amazing, giving us ideas of what to make and telling us to talk to the farmers to get ideas. Now let me tell you about the market, it is different than many farmers markets around because it is 100% producer run, no vendors. That means you are talking directly to the farmers who cared, nurtured, and harvested what they are selling. It also means that everything is local and in season, a style of cooking Jeff takes true to heart.


We paired up with two amazing guys who were from Toronto and started brain storming straight away. We decided on making a butternut squash and leek soup.


Shrimp and fresh veggie fritada (with local brown eggs)


and my contribution (surprise surprise) MUFFINS!!!!


Can I just tell you Jeff said this was the FIRST time anyone had made muffins in the class, my guess is since there are no recipes most people can't pull muffins out of their rump... well I did... and Jeff said they tasted great and not like they came out of my rump HA! Thanks Jeff :) Seriously though, the fact that he, a professional chef tried one and liked it meant the world to me.


10:15 am: We are back to the NYWCC and Jeff gives us the rundown on where things are, and what makes for a properly stocked pantry. Cooking local doesn't mean you have to eat boiled corn every night of the week, it allows for so much variety and creativity. The four groups of four all made different things, not one repeat.


11:45 am: Time to eat. It was a whirlwind of cooking and amazing to see what everyone came up with... and getting to eat our creations... totally the best part! We all left packed full and with leftovers in tow. Here's a look at what some of our lovely classmates (Betsy and Cathy) made! Stunning... seriously their presentation put us all to shame... just look at these!!!


Now I want to tell you about the amazing collaboration that made this possible for John and I. Foodbuzz and Electrolux paired up to pay for this event. They also donated $250 towards the ovarian cancer research fund in our name!! You can get Electrolux to donate more too by going and making a banana split here, for every split made a dollar is donated towards research.

I think my event fit perfectly inline with this cause. Eating fresh local veggies may not cure you of diseases but it is going to help improve your health and keep you healthy. This challenge taught us how much healthy variety you can still have by eating a fresh in season diet.


Come back later this week for that amazing muffin recipe I made :) It used farm fresh zucchini, raspberries, and peaches!

-------------------
Want more chow like what you just read? You can click to subscribe to the feed, follow me on twitter, or become a fan on facebook! Can't wait to see you there!

Have you guys heard of kale chips? I've seen them being made all over the place but never gave them a try until recently. They are super simple. Wash the kale, rip up into bit size pieces, toss with a little olive oil, sea salt, and pepper. Bake at 350 until crisp.


I liked them! I gave John one and he asked my why oh why was I feeding him green paper, and if it was ok if he didn't eat any more. HA So there you have it, one says tasty... the other says paper, I'll let you make them and decide for yourself what you think :D
Hi there! Welcome back! It's been awhile huh? May I offer you a little snack? Perhaps a sweet potato muffin?? These things happened by fluke this weekend. Those cans of pumpkin are still MIA in my supermarket so I moved onto the baby food isle and got me some gerber sweet potato baby food! Yup, me baking with baby food again, but it's oh so easy!!

These aren't a super sweet muffin but I think they are perfect for breakfast or a quick on the go snack. AKA when you are headed to your new house to paint and have yet to stock the kitchen with anything yet :)


Sweet Potato Muffins
recipe by steph chows

1 cup unbleached flour
1 cup whole wheat flour
2 teaspoons baking powder
1/4 teaspoon salt
1/2 teaspoon nutmeg
1/2 teaspoon cinnamon
2/3 cup sweet potato baby food (2 3.5 once containers AKA one package)
2 egg whites lightly beaten
3/4 cup fat free milk
1 teaspoon vanilla extract
1/2 cup splenda granulated (or use 1/2 cup white sugar)

2 tablespoons turbine sugar
1 teaspoon cinnamon

Preheat oven to 350F. Spray muffin tin with non-stick spray.

Mix together dry ingredients (flour through cinnamon) in a large bowl. In a smaller bowl, mix wet ingredients (sweet potato through splenda). In an even smaller bowl, mix the sugar and cinnamon.

Pour the wet mixture into the flour mixture and stir just until thoroughly moistened. Do not beat or overmix. Spoon about 1 heaping tablespoon of batter into each muffin cup. Sprinkle each half-full muffin with 1/2 teaspoon of cinnamon sugar and fill with remaining batter. Sprinkle remaining cinnamon sugar over each muffin.

Bake for 17-22 minutes, until a toothpick inserted into the center of a muffin comes out clean. Cool for a few minutes before serving.

CHOW!
Do you hate or love veggies? I'm a picky veggie eater, they have to be done right or I wont eat them. John just hates them, (yeah that's right "mr I eat healthy" doesn't like veggies) But I make him eat them anyway... so sweet of me right?

I'm always looking for quick and easy side dishes to add along with dinner. I found this one from Cooking Light and figured I'd give it a go! Only change I made was to add some sesame seeds into the mix.


The flavors weren't as intense as I thought they would be... 3 cloves of garlic and red pepper flakes?? I think steaming them at the end somehow lessened the intensity. Next time I'll add even more garlic and pepper flakes :)

The temperature has been down right chilly here, and the snow keeps on blowing... my nice professional long black wool coat has been put back into the closet and replaced with my crazy warm BRIGHT RED ski coat... not so subtle I know... but darn warm. A hat is always required, and gloves are of course a must. *sigh* I am far from being any form of stylish this time of year. Yeah... you should have realized I'm one of those comfort over style girls... what shoes am I wearing you may ask? Certainly not a cute little trendy pair of "boots"... I use quotes because really most of these "boots" wouldn't last 5 seconds in this weather... I've got on sh*tkicker boots for sure... and they keep my feet happy and warm :)

I digress... either way you come from style wise, this lasagna will warm you up just right for dinner. You can make a batch, eat half, and freeze the other half, it keeps great, and packs up perfect for lunch time as well... although you might want to pack it up in a larger container than this one...


Turkey and Spinach Lasagna (or Mushroom and Spinach Lasagna for the veggies)
by steph chows

In a large pan with a little olive oil brown up
1 lb 99% lean ground turkey (or to make it vegetarian friendly, 1 lb of chopped mushrooms)

Once cooked through add in
1-2 cups frozen spinach
Set aside

In a medium bowl mix together
15 once container part skim ricotta cheese
1/2 cup lower fat parmigiana cheese
1/3 cup skim milk
1/2 cup freshly chopped flat leave parsley
1 cup fat free mozzarella shredded
salt and pepper to taste

You will also need:
26 once jar diavola tomato sauce (or other spicy sauce)
1/2 cup part skim mozzarella shredded (use this as the top layer... it melts better)
whole wheat lasagna noodles

First pour a little sauce into the bottom of a 9x13 pan. Top off with a layer of whole wheat lasagna noodles. Then add half of your turkey spinach mixture. Next spread a 1/3 of your sauce over top. Then do a layer of your ricotta mixture. Now do your next layer of noodles going in the opposite direction (if you went long wise first, go across the short way now) this helps hold everything together better when you slice it up! Then put the remainder of your turkey/ 1/3 of the sauce and remainder of the ricotta on top. Put on one more layer of noodles and sauce, and top with your park skim cheese!

Bake at 350 for around 45 minutes.


Want more chow like what you just read? You can subscribe to the feed, follow me on twitter, or become a fan on facebook! Can't wait to see you there!
Who ever thought taking a happy healthy eggplant and deep fat frying it was a good idea?? OK OK it was a good and tasty idea... but come on now we can make up some eggplant parm without the fryer and still have it taste delish!


I need to thank my coworkers for making this recipe possible :) Erika showed up to work with some extra eggplants she needed to offload (I was happy to help) and Niki showed up with a bucketful of basil she was looking to offload (oh why thank you, don't mind if I do!). Needless to say, it was easy figuring out what I was having for dinner that evening! The recipe is straight from Eating Well (I just doubled the basil...come on I had it and it was tasty! Oh and I used whole wheat bread crumbs) Other than that, you can follow their recipe word for word :)


Eggplant Parm
from Eating Well

* 2 eggplants (about 2 pounds total)
* 3 egg whites
* 3 tablespoons water
* 1 cup fine dry breadcrumbs (I used whole wheat crumbs)
* 1/2 cup freshly grated Parmesan cheese (1 ounce), divided
* 1/2 teaspoon salt
* 1/2 teaspoon freshly ground pepper
* 1/4 cup slivered fresh basil leaves (I did more)
* 2 1/2 cups tomato sauce
* 3/4 cup grated part-skim mozzarella cheese (3 ounces)

Directions

Preheat oven to 400°F. Coat two baking sheets and an 8-by-11 1/2-inch baking dish with nonstick cooking spray.

Cut eggplants crosswise into 1/4-inch-thick slices. Whisk egg whites and water in a shallow dish until frothy. Combine breadcrumbs, 1/4 cup of the Parmesan, salt and pepper in another shallow dish. Dip the eggplant slices into the egg-white mixture, then coat with the breadcrumb mixture. (Discard any leftover breadcrumbs and egg white.) Arrange the eggplant slices in a single layer on the prepared baking sheets. Bake for 15 minutes, turn the eggplant slices over, and bake until crisp and golden, about 15 minutes longer.

Stir basil into tomato sauce. Spread about 1/2 cup of the sauce in the bottom of the prepared baking dish. Arrange half of the eggplant slices over the sauce, overlapping slightly. Spoon 1 cup of the remaining sauce over the eggplant and sprinkle with half of the mozzarella cheese. Add a layer of the remaining eggplant slices and top with the remaining sauce, mozzarella and Parmesan. Bake, uncovered, until the sauce bubbles and the top is golden, 15 to 20 minutes.
For those of you who have been around for a long time, you know I love LOVE this "salsa" "dip" "salad topper" whatever! It has become my hands down go to recipe for any type of gathering. I have yet to meet a person who hasn't loved it.

It's amusing at least one person at every event comes up to me and says "I don't like (raw onions/ beans/ peppers) but I love this stuff!!"

As I mentioned yesterday, it was Walton's 1st birthday!! I was able to grab a last minute crazy flight deal down to DC to take part in the festivities!! It was wonderful to see my family and how much Walton has grown since I last saw him. I also got to tag along with my sister and Stockton to a photoshoot friends of theirs gifted them.


These image were taken by Cynthia Sambro-Rier Photography. She was a pleasure to work with, if you live in the DC area and want pictures of your kids... give her a call :) (images taken from her blog and facebook page).

How cute is that little boy!!!

OK back to the Fiesta Dip!


Seriously, make this the day before any gathering, let it marinate over night, drain the morning of, and you are good to go! We normally serve it with Tostitos scoops, but it can work with any kind of chip or it is delicious over a salad.

Fiesta Dip
1 can black eyed peas
1 can shoe peg corn
1 red pepper diced (I used 1/2 a red and 1/2 an orange since we had it on hand)
1 green pepper diced
1 red onion diced

Rinse and drain peas corn

Add: 2 tbs Tiger Sauce (secret ingredient) a MUST (it's near the ketchup in Wegmans... if you have Wegmans near you)
3/4 cup white sugar (I used a little less)
1/2 cup apple cider vinegar
1/4 veg oil (I used about 3 Tbs instead of 4 Tbs also I've used olive oil when I didn't have vegetable oil on hand)

Mix and let stand (refrigerated) overnight.

Drain liquid before serving.
Serve with tostito scoops or other veggies or cucumber slices for dipping.
This also works great as a salad topper/dressing. Delicious!

...on top of a burger. Oh yes, bring on the tasty! My apologies to the veggies and vegans out there, I just couldn't help myself. There is something about a nice juicy burger that calls my name. I'd much rather make one at home, lets face it, the ones you get out are 100 times worse for you. This way I can choose a lean beef, not have it be 1/2 pound (don't look at me like you haven't polished off a half pounder on your own), and you can top it with whatever your little heart desires!

I'll be honest here, the mix of sauteed mushrooms, wilted spinach, a ton of black pepper, and a little crumbled goat cheese, would have been an amazing sandwich on its own... the burger was just an added bonus :)

So eat this alone, or on a burger like me. Either way, you're going to love it!

Put a little drizzle of olive oil in the pan, add your sliced baby bella mushrooms. Cook through. Add a few handfuls of spinach and a good helping of fresh ground pepper, and a dash of salt. Once the spinach is wilted, transfer to a bowl, or onto some bread. Sprinkle with goat cheese and enjoy!

Want more chow like what you just read? You can click to subscribe to the feed, follow me on twitter, or become a fan on facebook! Can't wait to see you there!
Copyright © 2012 :: steph chows ::.